5 READ-TIME
Best practice tips for treating cereal and pulse seeds on-farm
March 19, 2021
Cereal and pulse growers understand that treating your seed helps to protect your valuable crop against various seed- and soil-borne diseases. Perhaps you’ve been treating seed on-farm for years. Still, you may learn some new, best practices from this comprehensive guide. The Bayer team has developed some videos to demonstrate ideal processes for on-farm seed treatment.
Read on to learn more about best management practices for seed treating success. Come harvest time, you’ll be glad you did a great job of treating your cereal and pulse seed.
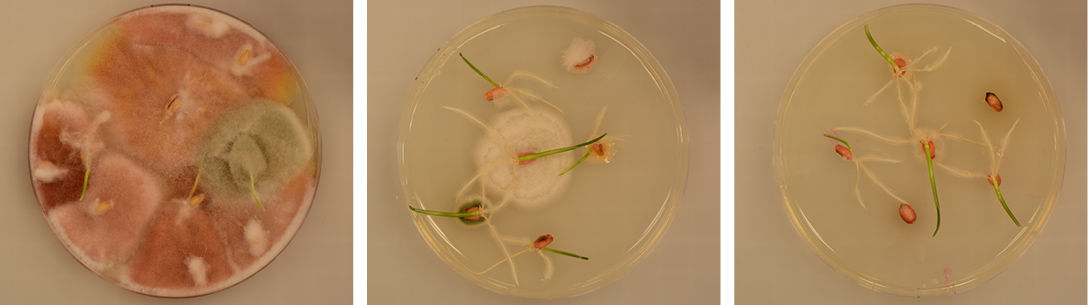
Figure 1. Seed treatment coverage: untreated (left), poor seed treatment distribution (centre), and even seed treatment coverage (right). All seed from same sample and infected with Fusarium graminearum.
Step 1: Start with clean seed
Before you set up your seed treatment system, you need to ensure you’ll be treating clean seed. Minimize chaff and dust that can prevent seed treatment from sticking and adds unnecessary bulk to the treatment mixture. Dust and other foreign particles will attract seed treatment, obstructing proper coverage and also causing buildup on treating equipment.
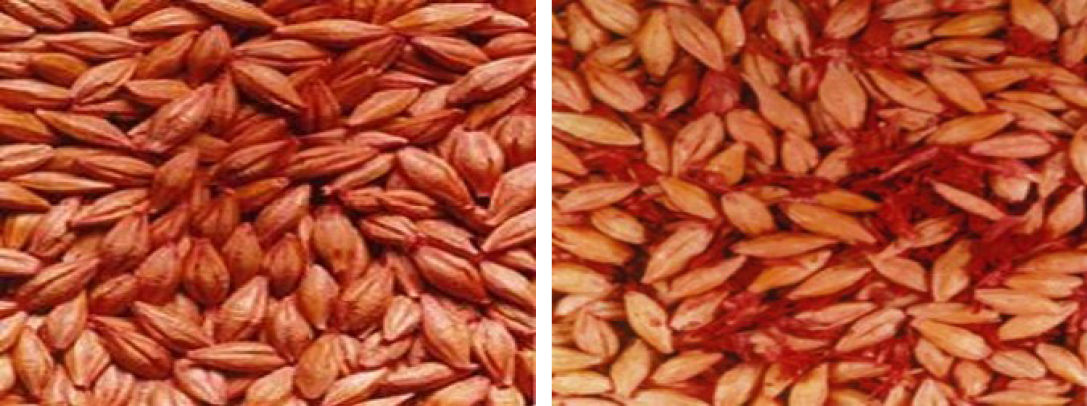
Figure 2: Cleaned seed (left) with seed treatment sticking to the seed, providing protection to the crop. Dirty seed (right) with seed treatment sticking to the chaff rather than providing thorough seed coverage and protection.
Step 2: Test the seed
To ensure your chosen seed lot is viable, send a sample to a lab to test for fungus, germination, and vigour. If the results are less than ideal, pick from another seed lot and test again. If the fungal scan for cereals shows Fusarium graminearum, Fusarium species, Cochliobolus sativus, and smut, you’ll also need to draw a fresh sample from another seed lot. When reviewing the seed test, consider the combined total infection rate of these pathogens. Alternaria, Cladosporium, and Epicoccum may show up on a fungal test. But these are weakly pathogenic and not likely to limit crop development. For pulses, Ascochyta and Fusarium species should be assessed. Refer to provincial guidelines for maximum pathogen levels to ensure your seed is within range. Seed treatment can help prevent plant infection from low levels of soil- and seed-borne diseases.
Step 3: Ensure the seed is warm and dry
Once you’re confident that your farm-saved, tested seed is healthy and within guidelines for fungal contamination, you can start to set up for seed treatment. Ensure that your chosen seed lot is warm and dry. Frozen seed can cause seed treatment to flash-freeze on the seed rather than coating and drying. Additionally, when frozen seed warms up, moisture can move to the outside of the seed (commonly referred to as “re-wetting”). This can cause the seed treatment to dry slowly and prevent it from adhering to the seed. Warm, dry seed can absorb seed treatment quicker. One way to help warm up seed in the bin prior to treating is to run the aeration fan on a warm day. Seed should also be dry by grain standards (14% for wheat). Higher moisture seed takes longer for seed treatment to dry and properly adhere.
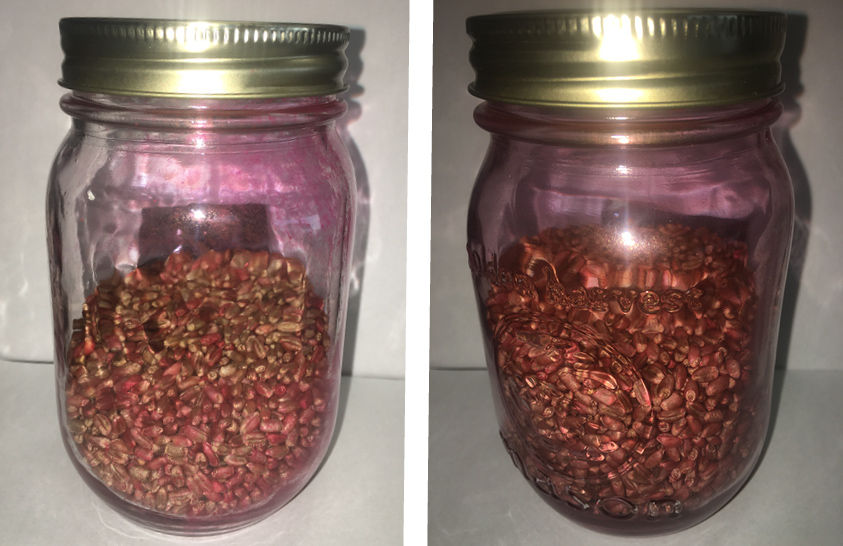
Figure 3. Seed treatment coverage comparison on seed treated while cold (left) compared to warm seed (right).
Step 4: Treat the Seed
Always read and follow label directions. Full instruction on proper seed treatment application techniques can be found on the product label. For safety, wear personal protective equipment that protects you from exposure to chemicals as directed by the label.
Mix the seed treatment
Mix according to the directions on the package. Be careful not to overmix. If required, use the water volume specified for the seed treatment product.
Check the label for rinsate directions at this stage. Consider rinsing seed treatment jugs directly into the treater for ease of clean-up. In this case, rinse water is part of the total water volume and should be measured to prevent over-dilution of the seed treatment mixture. Ensure the application rate is adjusted according to the amount of water added with the rinsate.
Calibrate the equipment
To properly treat seed, both the seed and product flowing through the treater must be measured and calibrated to ensure the correct volume of product is being applied to the mass of seed. Once your equipment is calibrated, treat a portion of seed and adjust the equipment if required. Ensure the treating rate is set according to the product label.
Treat the seed
Throughout the process, visually inspect the treated seed to ensure thorough, even coverage. Changes in environmental or seed temperature and humidity may all necessitate adjustment.
Handling fragile seed: Consider using conveyors and letdown devices to gently handle fragile seeds while moving them to the treater. If using an auger to transport fragile seed prior to treating, run the auger full and slow.
Regardless of seed type, overhandling of seed may damage the seed coat. Consider incorporating seed treating as one of your transporting mechanisms to reduce overhandling.
Secondary mixing
Secondary mixing is critical for complete coverage on the seed. An auger or any screw-type mixing device can be used for secondary mixing. When using an auger, it is best to run it at a maximum of two-thirds full. A full auger does not allow seed to mix quickly enough as seed moves up in the auger. Check coverage and adjust auger speed accordingly. If treating pulses, a conveyor may provide limited secondary mixing.
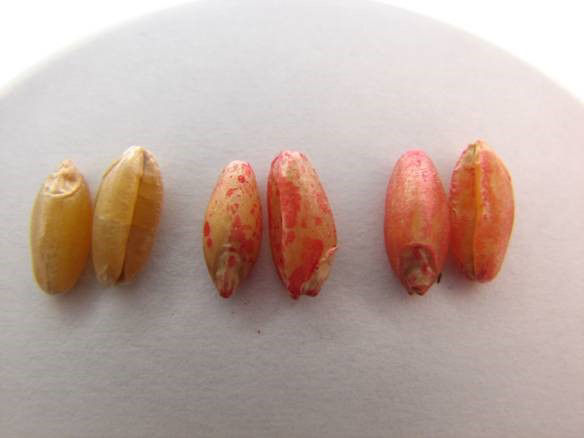
Figure 4. Demonstrating the effect of secondary mixing. From left to right: untreated, treated without secondary mixing, treated with secondary mixing.
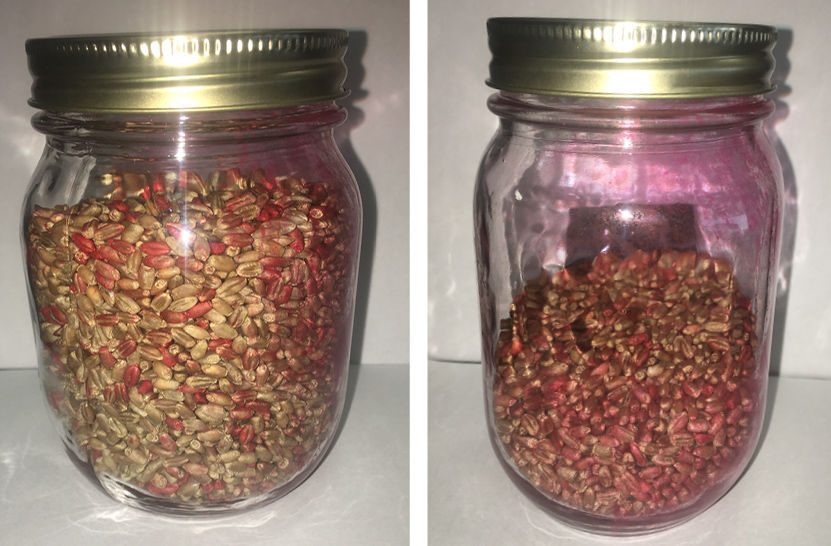
Figure 5. Seed treatment coverage simulation of a full auger (left) compared to a half-full auger (right).
Allow adequate time for the seed treatment to dry on the seed
This can help prevent clumping or packing of seed, bridging in trucks or bins and metering issues during seeding. Dry time is dependent on environmental conditions, seed temperature and seed moisture content.
Clean the treating equipment
Commercial grain must not be contaminated with treated seed. Consider using equipment for treated seed mixing and storage that will not be used for handling commercial grain. If this is not possible, be sure to clean out equipment thoroughly. If you don’t have time to clean equipment immediately after use, consider labelling this equipment so that it will not accidentally be used to handle commercial grain.
To effectively clean your seed treating equipment:
- Thoroughly sweep or vacuum all surfaces. Check pinch points where seed could get caught. Disassemble racks, tarps and other areas where seed is caught.
- Blow out tubing pipes or angle irons on equipment with compressed air. Ensure you are in a location away from pollinators and pollinator habitat.
- Pressure wash equipment with warm or hot water and an industrial cleaner such as Spray Nine® cleaner.
- Dispose of treated seed, wash water, residues and containers according to the seed treatment label directions
Planting all the treated seed is a simple way of avoiding comingling with commercial grain. Containers may be recyclable, returnable or refillable. Check the package and label for additional direction.
For disposal of unused product, contact the provincial regulatory agency or CleanFARMS.
Evaluate your seed treatment work
Assess seed handling during the treating process by visually inspecting seeds, counting cracked seeds, or performing a final germination test.
This can help inform your treatment process for next time. Make notes to help you remember what to adjust next year!
For information about specific seed treatment products please contact your local Bayer representative or visit the website.
Seed Testing and Cleaning
- Remove chaff and dust to ensure better seed treatment adhesion.
- Conduct fungal scans, germination tests, and vigor tests.
- Link to the Interpreting Seed Tests Video
- Identify key pathogens in cereals and pulses; assess infection rates.
- Consider switching seed lots if test results indicate poor seed quality.
Optimizing Seed Temperature and Moisture
- Warm seed before treatment to avoid flash-freezing and re-wetting.
- Use aeration fans to warm seed in bins.
- Ensure seed is dry to prevent clumping and poor adhesion during treatment.
- Link to Safeguard your seed – no matter the soil temperature article.
Mixing and Calibration for Precision
- Mix seed treatments as directed; avoid overmixing.
- Include rinsate in total water volume; adjust application rates accordingly.
- Calibrate equipment to ensure accurate product and seed flow rates.
- Link to Seed Treatments: Maximizing Results with Any Equipment Video
Monitoring and Adjusting During Treatment
- Visually inspect treated seed for even coverage throughout the process.
- Adjust treatment settings based on changes in seed or environmental conditions.
Secondary Mixing for Complete Coverage
- Use augers or screw-type devices for secondary mixing.
- Run augers at two-thirds capacity for optimal mixing speed and coverage.
- Link to 6 Crucial Last-Minute Tips for Treating Seed article.
Post-Treatment Drying and Handling
- Allow sufficient drying time to prevent clumping and bridging in storage.
- Gently handle fragile seeds to avoid damage; use conveyors when possible.
Equipment Cleanout and Seed Disposal
- Thoroughly clean equipment to avoid contamination of commercial grain.
- Dispose of treated seed and residues following label directions.
Post-Treatment Assessment
- Inspect seeds post-treatment for cracks or damage.
- Perform final germination tests to inform future treatment adjustments.
- For information about specific seed treatment products please contact your local Bayer representative or visit the website.
Legal statements:
ALWAYS READ AND FOLLOW PESTICIDE LABEL DIRECTIONS. Performance may vary from location to location and from year to year, as local growing, soil and weather conditions may vary. Growers should evaluate data from multiple locations and years whenever possible and should consider the impacts of these conditions on the grower’s fields.
Bayer SeedGrowth is a registered trademark of Bayer Group. Used under license. All other trademarks are the property of their respective owners. Bayer CropScience Inc. is a member of CropLife Canada. ©2021 Bayer Group. All rights reserved. 2023_S1_CA